Posts

Weekend Project: Nerf Dart Counter (Ammo Counter)

Image
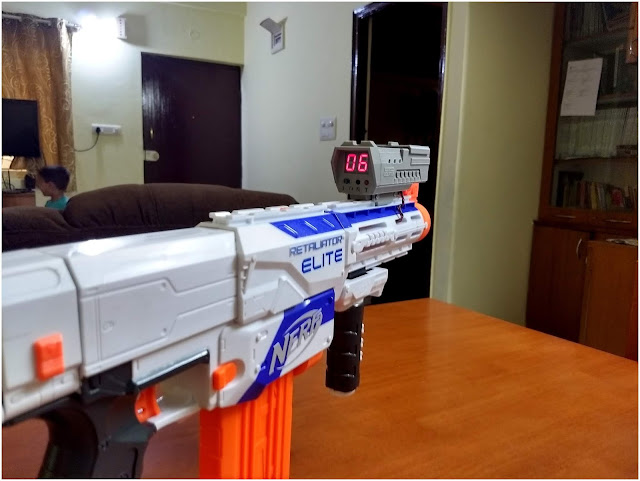
Recently I bought a Nerf Retaliator for my son on his birthday. I was scouting thingiverse  for some accessories to print like Nerf Sight , then I came across  AmmoCounter Mk1 Scope Case  by  Nathaniel Deal . Ammo counter lets you specify the magazine size and it will count down as you fire each shot. It will let you know how many bullets are left at any point of time. It is particularly useful for rapid fire guns and guns with 12, 18 or higher capacity magazines. AmmoCounter Mk1 Scope Case  has a nice scope face which can accommodate two 7-segment displays, 2 push button switches and an on-off switch. It has a separate compartment for 9V battery, has openings to route the sensor wire and has removable tracks to put it on the tact rail. Over all a very well designed case.  I was really impressed with the counter and decided to build one for my son. Dart Counter mounted on top of the Barrel extension A small video with Dart counter in action I printed the case to see

Nuances Series #1: Unintentional Spike

Image
This is the first post of a series, the idea is to post about some easy to overlook things while designing and building embedded hardware and applications. This post in particular is about a relay board which is driven over I2C. I was getting unintentional spikes on my load which is connected to the relay. At office, we are moving from C to C++ and I am new to object oriented programming. Learning theory is all good, but from my experience, we learn something well when we try to use it solve real problems with real constraints. So I started a pet project to build an IoT board based on ESP8266. I know that if I need to get something done, I should aim for MVP (minimum viable product) but this being more of a learning exercise than a project which needs to be completed asap, I started designing a platform independent code base which I would be able to leverage for future projects. (more about this probably in a later blog) Coming back to the topic, this particular board i am working

Exporting Solder mask with untented Vias as SVG from KiCad

Image
Turn around time as well as cost for getting PCBs made from a PCB house is pretty high, especially when you want to make a single board for a special project or as part of prototyping. Its even more frustrating when you realize that you have messed up some things in the design and you have to do another iteration. From some time now, i have started milling my own PCBs at home using a CNC machine which has worked our really well for boards with a reasonable track width. One of the things I struggled a bit in the beginning was exporting solder mask as SVG. I print the solder mask on a transparency paper and use UV curable ink to apply solder mask to the board. At home i dont have a way to put vias on double sided PCBs, I solder a small wire on both sides to make it act like a via. When exporting solder mask layer as SVG from KiCad, there is no option to tell it not to tent vias. It is available when exporting data as Gerber but not when exporting it as SVG.  Now this is a problem.

No nonsense LPG sensor

Image
Since last week there seems to be some faint LPG smell in the kitchen, which only my wife and mom can sense. So the request (read it as *order*) came to do something about it. The smell was present only when the stove was ON. It was very faint, may be the hob needs a service. I had a gas sensor MQ-05 in my collection.I decided to make an LPG sensor and install it in kitchen as an interim solution. The sensor gives a reading of about 200mV when in steady state and it takes about 40 seconds to reach there. In my case it starts off at around 1.04V and goes down to 200mV.  These sensors have a heater which takes sometime to heat up, and till then the readings are not reliable. The sensor board I had has a preset, and I have set it to trigger at  1.1V so that it does not start buzzing every time power comes back up after a few minutes of outage but is sensitive enough to detect a gas leak from where I have it plugged in. Sensor Goes to ~1.04V and comes down to ~200mV in about 2

When one hobby grease the wheels of another - Garmin Mount for Profile design T2 Aerobar

Image
In Bangalore the road bike race season starts with ITT (individual time trial). I started training with my Profile design T2 Aerobars and quickly realized that the Garmin on my Specialized Allez Sprint was way too in, that it was out right dangerous looking at the numbers while riding. Power of 3D printing, I set out to design a custom Garmin mount in Fusion 360. The idea was to design something which will fit my TT bar and will keep the Garmin just behind my palms. It should be easy to fix and should securely hold the Garmin. I had the mount plate, which comes along with Garmin, lying around so I took a short cut and designed the mount to take the plate instead of trying to design that part myself. Took me about an hour to design and gave a print. 2.5 hours later, i had the mount in my had ready to be fixed. The mount weighs meager 16.3g. Had white PLA on the printer so first printed it in white, rode around for a while to make sure that it fits well and holds well. Link to th

Creative Era

All legends of the yesteryear where people with raw talent, be it artist or scientists. Then there was the knowledge era where knowledge was power, internet was not accessible to all, YouTube did not exist. Now we are in an era where knowledge is freely available, and I call this a creative era. Today you don't need raw talent or in depth knowledge, you are only limited by your imagination. We are in a time where a guy like me who cannot draw a straight line with my hands can use parametric design to design and 3D print anything I imagine. People with music in their hearts can create amazing songs even if they cant hold a single note. I think that is a good thing.